How to Use a Router With These 11+ Steps (Ultimate Guide)
Disclosure: This post may contain affiliate links from online retailers, including Amazon. If you click a link and buy tools or supplies, I may earn a small commission—at no extra cost to you. This allows me to provide you free helpful content, and I genuinely appreciate your support🤝 Learn more
If you’ve just picked up a woodworking router, congratulations—you’ve added one of the most versatile tools to your workshop! A router can shape edges, cut grooves, and help you make professional-quality joints, but only if you know what you’re doing. Trust me, when I first fired up my router, I had no idea what I was doing, and let’s just say my first few cuts looked like a beaver had chewed them instead of a sharp carbide bit.
The good news? With a bit of practice and the right know-how, you’ll be cutting like a pro in no time.
In this guide, I’ll break down how to use a router in plain English—step by step—so you can skip the confusion and start making smooth edges, clean joints, and pro-looking projects even if you’re totally new to woodworking. Whether you’re trimming laminate, cutting grooves, or just adding a decorative edge to a board, this post will walk you through everything you need to know—without overcomplicating it.
Let’s fire it up and get to work.
What Is a Router and What Does It Do?

I’ll be honest—when I was a kid first learning the trades, routers confused the heck outta me. It wasn’t like a circular saw or a hammer where the purpose is obvious.
This weird spinning motor with a tiny blade sticking out of it didn’t look like much… until I saw what it could do.
Smooth edges, perfect grooves, detailed joinery was awesome to see for me. It was like unlocking a whole new level in woodworking.
Build Smarter – For FREE!
Join the Tekton Crew and grab 3 FREE Workbench Build Plans with 3D models—plus exclusive DIY tips, tool reviews, and more!
So what exactly is a router?
A router is a high-speed power tool used to shape wood, cut clean joints, create decorative edges, and hollow out areas in a piece of wood.
You can use it freehand or mount it to a table depending on the job. These are usually distinguished as router tables and just routers.

Most routers spin at over 20,000 RPM and work by spinning a router bit (which comes in all shapes and sizes) into the wood to cut or carve with precision.
Beyond table and freehand routers, there are two main types of router bases: fixed-base and plunge base.

A fixed-base router has a set depth, which is great for edge work and repeatable cuts.
A plunge router, on the other hand, allows you to lower the bit into the material mid-cut, which is awesome for doing inlays, mortises, or cutting out shapes in the middle of a board.
Both have their place, but if you’re just starting out, I’d recommend a fixed-base model cuz it’s a little easier to control.
Here’s where routers really shine:
- Cutting rabbets and dadoes for shelves and joinery
- Adding decorative edges with round-over or ogee bits
- Creating inlays or custom recesses
- Flush-trimming pieces using a bearing-guided bit
- Routing out hinge mortises or door strike plates
- Making perfectly straight grooves with a guide or jig
Honestly, it’s one of those tools where once you understand what it can do, you start seeing 10 new projects you want to try. It’s like having a chisel, sander, and edge shaper all in one compact powerhouse.
Up next, we’ll talk safety because even though routers are incredible, they’ll humble you pretty quick if you don’t respect them.
Safety First: Essential Router Safety Tips

Look, I’ve been using routers and all the other tools in woodworking and construction for decades now, and I still get a tiny jolt of adrenaline when I flip one on.
They’re loud, fast, and powerful—which is part of what makes them so dang effective.
But that power demands respect. If you skip the safety stuff, it’s not a matter of if something goes wrong—it’s when.

PPE is Non-Negotiable.
That router bit is spinning at crazy speeds, and it’s flinging dust and tiny chips everywhere.
Hearing protection is a good idea too, especially on longer jobs. I always skip gloves for power tools but this is up to you. I like to feel the tool directly and maintain better control and gloves also present a snagging danger in my mind.
I can’t stress that enough. I’ve seen too many guys get too comfortable and leave it plugged in, thinking “I’ll just tighten it real quick.” One accidental trigger press and it’s game over.
You always want to feed the router against the direction the bit is spinning. Most bits spin clockwise (when viewed from above), so that means you should move the router left to right when edge-routing the outer edge of a board. Going the wrong direction can cause the router to catch and yank itself forward—or worse, kick back toward you.
Don’t white-knuckle it, but you want to be ready if the router starts to pull. I usually plant my feet shoulder-width apart and lean into the cut slightly so I can control the movement.
A few more quick safety tips:
- Set the depth before you start, and don’t adjust it mid-cut unless your router is designed for that.
- Secure your workpiece. I’ve chased boards across the bench before because I forgot to clamp them—won’t make that mistake twice.
- Watch your cord. Especially when routing longer edges or walking around a large workbench, you don’t want to trip mid-pass.
Bottom line: routers are amazing tools, but you gotta treat them with caution and care. Think of it like driving a sports car—you can do incredible things with it, but only if you stay in control.
The Parts of a Router (and What They Do)
One of the biggest breakthroughs for me when learning how to use a router was simply understanding what each part did. Before that, it all looked like a noisy chunk of plastic and metal with a spinning blade.
Once I broke it down, though, everything clicked—and I could finally use the thing without second-guessing myself every step of the way. You can’t know how to use a router without knowing the parts.
This picture covers the universal parts on most routers using my router as an example:

Here’s a quick rundown of the main parts of a router and what they do:
1. The Base: This is the flat plate that sits on your work surface. It keeps the router stable and helps you guide it along your cut. You’ll see either a fixed base (great for edge work and steady cuts) or a plunge base (lets you lower the bit into the material mid-cut). I’ve got both now, but I started with a fixed base and it served me well.
2. The Motor: This is the heart of the router. It spins the bit anywhere from 10,000 to 25,000+ RPM. Some routers have adjustable speeds, which is helpful when switching between softwoods and hardwoods or using larger bits that need slower speeds.
3. The Collet: The collet is the part that holds the bit in place. It’s a small metal sleeve that tightens around the bit when you crank down the locking nut. Here’s a big tip I learned the hard way: don’t bottom out the bit. Leave about 1/8″ of space between the bit and the bottom of the collet to reduce vibration and avoid jamming.
4. The Depth Adjustment: This lets you control how deep the bit cuts into the wood. On fixed-base routers, you’ll adjust the motor height manually. On plunge routers, you can set a depth stop so it only drops down to a certain level. Take your time dialing this in—it makes all the difference between a pro finish and a janky mess.
5. Handles or Grips: Most routers have two side handles for control. Trim routers usually are just contoured around the body to grip easily. Either way, you want to keep both hands on the tool while cutting in most situations. One-hand routing with a full size router is a shortcut to messing up your project or worse—your fingers. Trim routers are usually meant to be used one-handed.
6. The Bit: The router bit is the business end of the whole setup. It comes in all shapes and sizes depending on what you want to do—round-over, flush-trim, chamfer, dado, etc. Swapping them out is simple once you’ve done it a few times, but always double-check that it’s seated properly and tight before powering on.
Once you know what each part does, everything becomes way less intimidating and you’ll know how to use a router better. You stop treating the tool like it’s going to jump out of your hands and start using it with confidence.
Build Smarter – For FREE!
Join the Tekton Crew and grab 3 FREE Workbench Build Plans with 3D models—plus exclusive DIY tips, tool reviews, and more!
Choosing the Right Router Bit for the Job
Router bits are like drill bits on steroids—and if you don’t know how to use a router then you don’t know which one to grab and you’ll feel overwhelmed fast.
When I was learning how to use a router I remember opening my first bit set and thinking, “Uh… which one of these weird shapes do I use?” I picked the roundest-looking one and just went for it. Spoiler: it wasn’t the right one.
So here’s a breakdown to make it way less confusing.
Straight Bits

These are your go-to for cutting grooves, dadoes, or hollowing out areas. Think shelf dados or inlay recesses. If you’re building basic cabinetry or bookshelves, this bit is gold.
Flush Trim Bits
:max_bytes(150000):strip_icc()/288-Flush-Trim-router-Bits-3-7a66ebbf2b1845f78e75bf6330f8e090.jpg)
I use these constantly. They have a little bearing at the top or bottom and let you trim one piece of wood to match the shape of another. Perfect for trimming laminate or template routing. Honestly, once you use this bit, it’ll be one of your favorites too.
Round-Over Bits

This is the classic edge bit that gives your workpiece a smooth, professional-looking curved edge. Makes your projects look finished and polished. I’ve probably used this bit more than any other—especially when building furniture or trim pieces.
Chamfer Bits
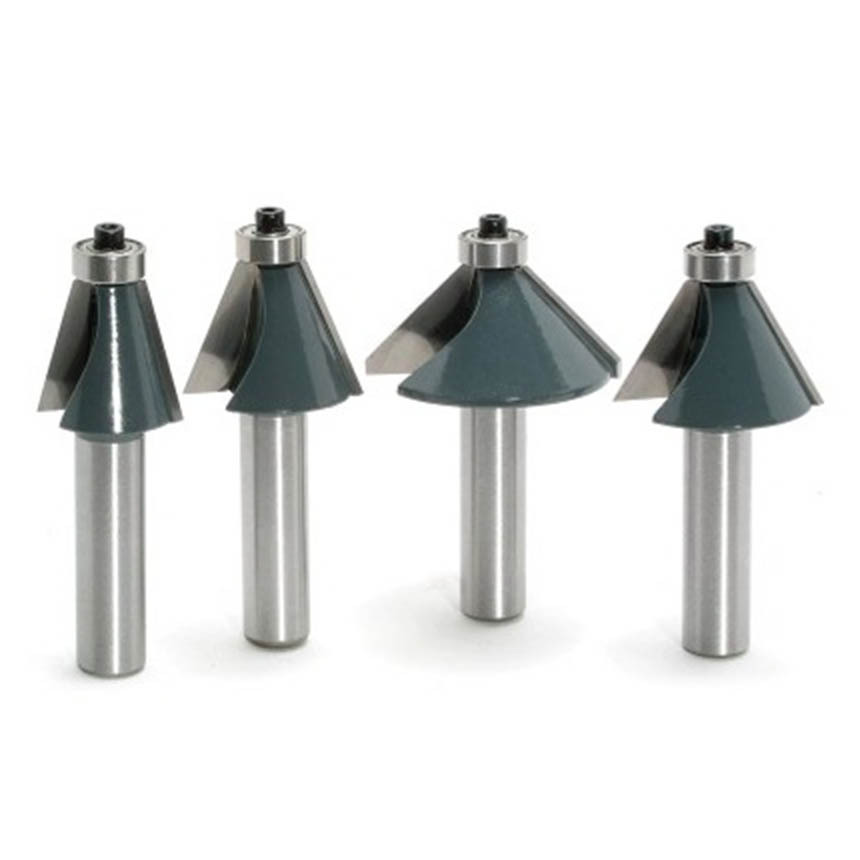
These cut a beveled edge at whatever angle the bit is set to—usually 45°. It’s great for adding a clean, sharp look to corners. I’ve used these a lot on homemade picture frames and trim projects.
Rabbeting Bits
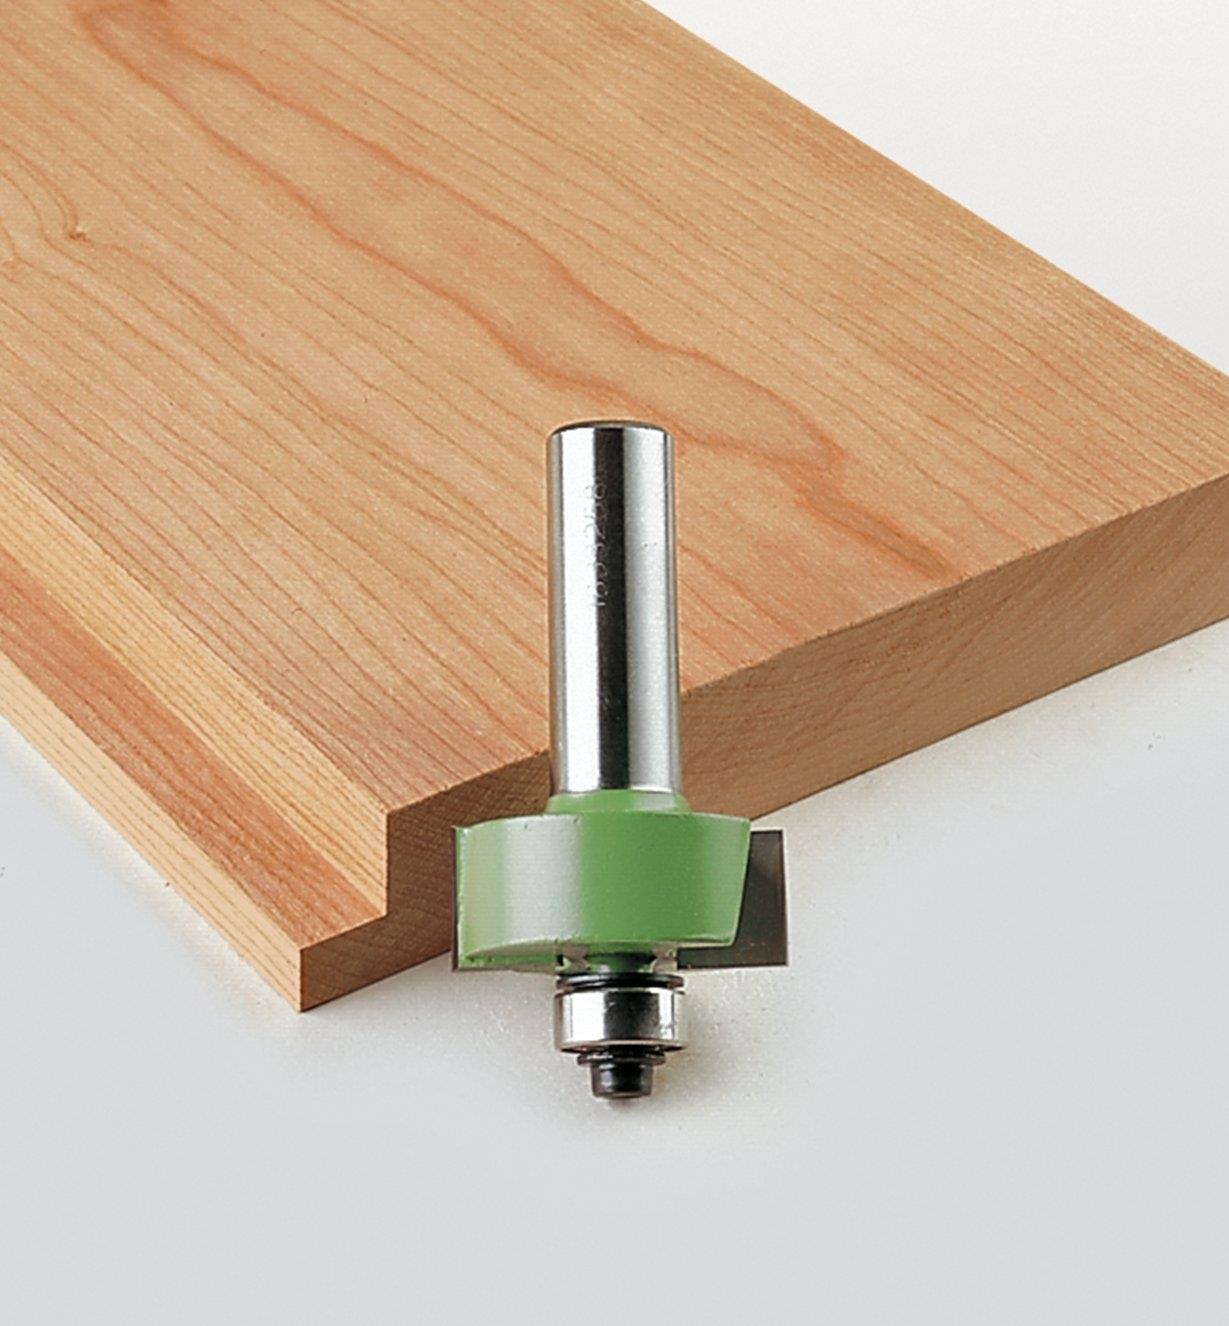
These are made to cut a “step” along the edge of a board, like for fitting the back of a cabinet or a glass pane into a frame. They come with interchangeable bearings for different depths. Just don’t forget to test the depth on scrap—voice of experience here.
Cove, Ogee, and Decorative Bits

These are more advanced or for specific looks, like classic molding details. Super cool when used right, but not necessary to start with when learning how to use a router.
Now—bit materials. You’ll usually find two types:
- High-Speed Steel (HSS): Cheaper, dulls quicker
- Carbide-Tipped: More expensive, but way more durable and worth it in the long run
Here’s my advice: If you’re just learning how to use a router, grab a basic carbide-tipped set with straight, flush-trim, round-over, and chamfer bits. That combo alone can take you a long way.
And don’t cheap out on bit quality. I’ve had bits shatter mid-cut, and it’s terrifying. Stick with decent brands—Freud, Whiteside, Bosch, even Ryobi for occasional beginner use.
I lean toward Bosch for the majority of my work and Whiteside to be extra precise/clean. Check out these awesome router bit sets that are perfect for properly learning how to use a router with:

Freud Bit Set
These bits feature Freud’s TiCo carbide and Perma-SHIELD Coating, and come packed in an attractive wooden shadow box case.

Bosch Bit Set
These deliver precision and durability with premium-quality micrograin carbide tips for an extra-fine finish and increased wear resistance. *My go-to.

Whiteside Bit Set
Several notable woodworking sources have named Whiteside as the best router bits available on the market.

Ryobi Bit Set
Not high end but these are a perfect budget-friendly option to get you started with many different bits.
How to Use a Router: Step-by-Step Instructions
If you’ve made it this far in this guide on learning how to use a router, you’re already way ahead of most beginners.
Learning how to use a router is one of those turning points in your DIY journey. Once you get the hang of it, you’ll wonder how you ever built anything without one.
But the key to great results—clean cuts, smooth edges, no blowouts—is in the setup and the method.
So here’s everything I’ve learned on how to use a router over the years, rolled into one solid routine for how to use a router that just works.
1. Start with the Right Workspace
Clear off your bench and clamp your material down tight. You want room to move and no wobble in the wood. A router’s got some torque to it, and if your board shifts mid-pass, your cut’s toast.
2. Choose the Bit and Install It Properly
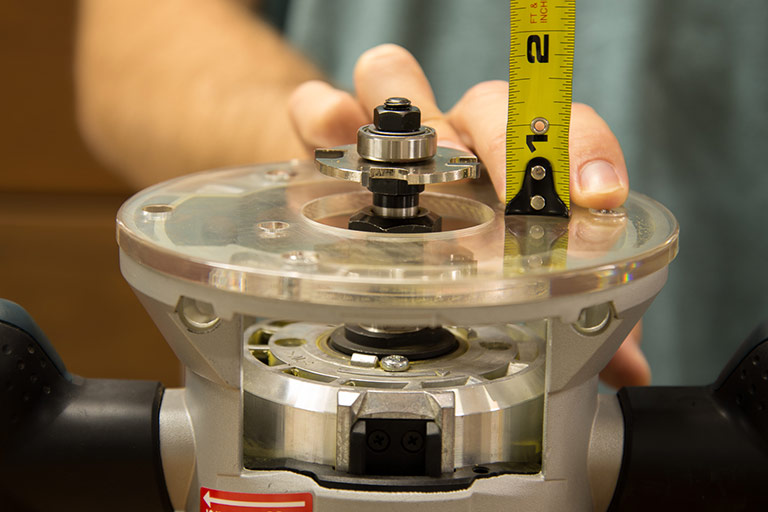
Grab the right bit for the job—round-over, straight, flush-trim, whatever you need. Insert it into the collet, leaving about 1/8″ of space above the tip so it’s not bottomed out. Tighten it down snug. I always give mine a light tug to double-check. A loose bit mid-cut is sketchy.
3. Adjust Your Cutting Depth (Don’t Eyeball It)
Dial in the cutting depth before you fire it up. For edge work, a shallow cut is usually enough. For grooves or dados, I start with no more than 1/4″ per pass. Deeper than that, and you’ll risk burning the wood or bogging down the motor. And always—always—test your depth on scrap wood first. Trust me, even now I never skip that.
4. Feed the Router the Right Direction

This is where things go wrong fast if you’re not careful. Always move the router against the direction the bit is spinning. On outside edges, that means left to right. It gives you control and keeps the bit from grabbing and launching the tool. Feed it the wrong way and the router can jerk or tear the edge up.
5. Power Up and Ease Into the Cut
Let the router get up to full speed before touching the wood. Keep both hands on the tool, stand steady, and guide it slowly into the work. Don’t force it—let the bit do the work. If you hear the motor straining or smell burning, back off and check your depth or speed.
6. Make Multiple Passes for Deeper Cuts
Trying to cut everything in one go is a rookie move (and yeah, I’ve done it many times). Instead, do a few shallow passes. It’ll feel way more controlled, your bit will last longer, and the finish will look way cleaner.
Patience is key when learning how to use a router!
7. Go Slow and Steady for Smooth Results
Rushing a pass almost always leads to rough edges or uneven cuts. Find a pace that sounds and feels right—it’s kind of like driving a stick shift. With time, you’ll just feel when it’s going right after you learn how to use a router properly.
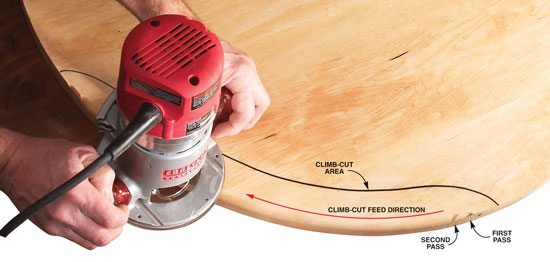
8. Use Climb Cuts Carefully (Pro Tip)
A climb cut—moving the router in the same direction as the bit—can leave a super smooth finish, but it also increases the risk of the router running away from you. I use this only on the final pass and always with a tight grip and full focus. Test it on scrap first.
I typically don’t recommend this for beginners who are learning how to use a router, but it is a great method to implement as you get better.
9. Watch the End Grain
Routing end grain is where tear-out loves to happen. The fix? Do those cuts first. Then, when you route the long edges, it cleans up any splintering left behind. It’s a simple trick, but it makes a big difference.
10. Know When to Use a Router Table
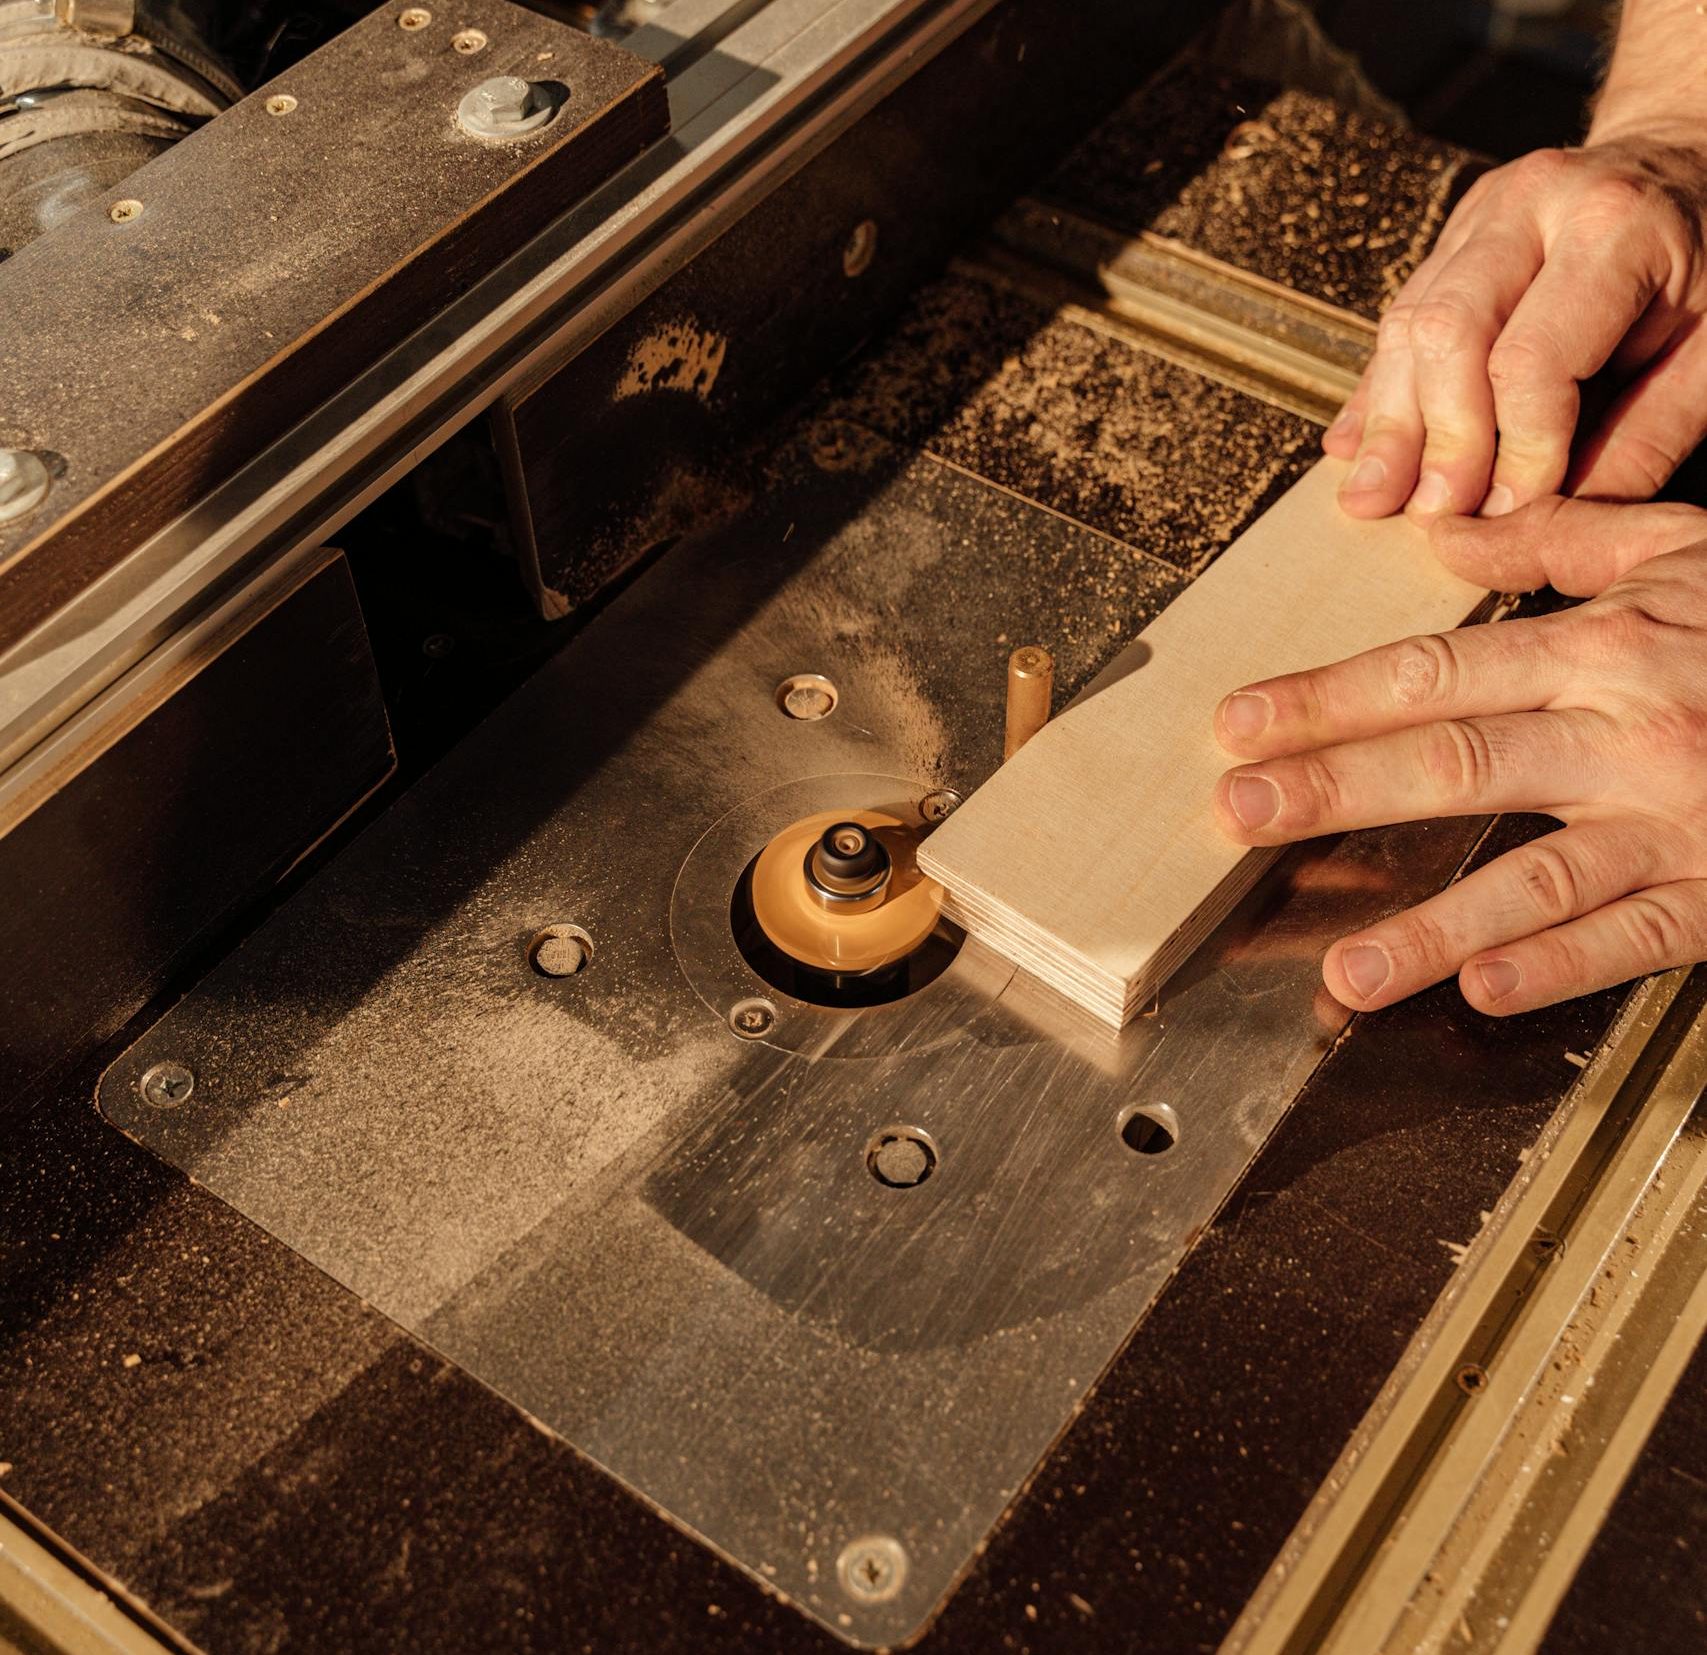
For small pieces, thin stock, or really fine work, a router table is your best friend. It gives you better control and helps avoid tipping or uneven passes. I do most of my shaping by hand, but for things like tiny moldings or consistent bevels, the router table is a lifesaver.
11. Clean As You Go
Dust and chips under the base can throw off your depth and tilt your cuts. I keep a little brush nearby to clean the base between passes, especially on longer jobs. Dust collection ports help too if your router has one.
Mastering how to use a router is mostly about muscle memory and feel. Follow this routine, keep practicing on scrap, and before long you’ll be cutting clean, smooth profiles like you’ve been doing it for years.
Common Mistakes Beginners Make (And How to Avoid Them)
Let’s be real—nobody picks up a router and just nails it right out of the gate. I sure didn’t. My first few projects had burn marks, uneven edges, and one really ugly gouge that still haunts me. The good news? Most rookie mistakes are easy to avoid once you know what to look out for.
⛔Feeding the Wrong Direction
This one gets more people than you’d think. Feed the router against the rotation of the bit. Most bits spin clockwise, which means you should move left to right along the edge. Go the wrong way, and the router can grab the wood and take off on you—scary and dangerous.
⛔Cutting Too Deep in One Pass
Big mistake. Taking off too much at once stresses the motor, overheats the bit, and chews up the wood. Stick to shallow passes—1/8″ or so—and sneak up on your final depth. I’ve scorched more boards than I care to admit learning this lesson.
⛔Skipping Test Cuts
You think you’ve got the depth right. You think the bit’s clean and the fence is square. But if you don’t run a quick test on scrap wood, you’re gambling with your actual project. One bad pass can ruin hours of prep. I always test—even when I’m sure.
⛔Not Clamping the Workpiece Properly
A router has torque, and if your board isn’t secured, it’ll shift mid-cut—or worse, go airborne. I’ve chased a loose 1×6 across my bench more than once. Clamps are cheap insurance.
⛔Using a Dull or Dirty Bit
Dull bits don’t just cut poorly—they burn the wood, cause tear-out, and put extra strain on your router. Keep your bits clean and replace them when needed. You’ll hear the difference when it’s time for a new one.
⛔Forgetting to Check Bit Tightness
This one’s scary. I’ve had a bit slowly work its way loose mid-cut. Always give the collet a final snug twist before powering on. It only takes a second but can save your fingers and your work.
⛔Routing Without a Clear Plan
This is the classic “wing it” mistake. You start cutting without thinking through the order, the direction, or how you’ll handle corners. That’s how you end up with splintered edges or a wonky profile. I like to mark my boards and walk through the cut before the router even leaves the bench.
⛔Ignoring Dust Build-Up
Dust under the base can throw off your depth and cause the router to tilt slightly during a pass. I’ve had this happen and didn’t realize it until the edge looked uneven. Quick brush-off between passes solves it.
Learning how to use a router is just as much about avoiding the wrong moves as it is doing the right ones. Every mistake teaches you something—and once you’ve made a few, you’ll get better at spotting them before they happen.
In my newsletter the crew and I always address common mistakes and the best fixes to go with them. Come join us!
Build Smarter – For FREE!
Join the Tekton Crew and grab 3 FREE Workbench Build Plans with 3D models—plus exclusive DIY tips, tool reviews, and more!
When to Use a Router vs Other Tools (Table Saw, Jigsaw, Trim Tools)
Routers are incredibly versatile—but they’re not always the best choice. I’ve learned over the years that using the wrong tool for the job usually leads to a messy result or wasted time. So here’s how I break it down when deciding if the router is the right call.

1. Need to shape or profile an edge? → Use the Router
If you’re adding a round-over, chamfer, or decorative edge to a board—router wins every time. You could try sanding or planing it by hand, but the router gives you that clean, repeatable finish. This is what it’s built for.
2. Cutting a straight line through a board? → Use a Table Saw
Let’s say you’re ripping a board to width or doing long, straight cuts—go with the table saw. While a router can cut straight dadoes and grooves, it’s slower and trickier to line up for long rips. The table saw does that faster and cleaner.
3. Cutting curves or irregular shapes? → Use a Jigsaw
Routers don’t do well with freehand curves unless you’ve got a template and a guide. For scrolls, circles, or odd cutouts, grab a jigsaw or bandsaw. Then, come back with a router and a flush trim bit to clean it up perfectly using a pattern or template.
4. Need a flush finish or precision trimming? → Use a Router with a Flush Trim Bit
This is one of my favorite uses. If you glued a veneer or edge banding and need it perfectly flush with the surface, nothing beats a router with a bearing-guided flush trim bit. Way cleaner than trying to sand or slice it down by hand.
5. Trimming doors or molding? → Depends
If you’re adjusting a door height or doing rough trim work, a circular saw or planer might be faster. But for hinge mortises or fine detail? Router all the way.
6. Creating joinery or grooves? → Both Tools Can Work
A table saw with a dado blade can cut grooves, but routers are better when you want adjustability and cleaner ends. For shelf dados or drawer slots, I usually go router—it’s just more flexible and safer for small parts.
7. Working with small, thin pieces? → Use a Router Table
Trying to trim a 1″ strip on a table saw feels sketchy. Routers (especially in a router table) are way safer and more precise for this kind of work.
So the breakdown really depends on what you’re trying to do:
- Straight cuts = table saw
- Curves = jigsaw
- Fine shaping, edge work, and trimming = router
Learning when not to use a router is just as helpful as learning how to use one. It’s about picking the right tool for the task so you work smarter—not harder.
How to Use A Router Final Thoughts
I’ll be honest—routers used to intimidate me. All that noise, that spinning blur of steel, the chance of messing up a clean board with one wrong move. But once I learned how to use a router the right way, it completely changed how I build. Suddenly, projects looked cleaner, joinery fit tighter, and I had way more control over the final result.
The key? Respect the tool, start simple, and don’t skip the setup. With a little practice and the right bit, you’ll go from hesitant to confident in no time. And trust me—when you pull off your first flawless round-over or perfect dado cut, you’ll wonder why you didn’t start sooner.
If this guide helped you feel a little more confident, I’d love to have you join the Tekton Travis email list. Every week, I send out hands-on tips, gear guides, and real-world project advice for DIYers and builders like us—straight from the shop, no fluff.
👉 And if you want to keep learning, check out my Ultimate Guide to Woodworking or my deep dive into the Best Woodworking Tools for Beginners. They’re packed with lessons I wish I had when I was first starting out.
Now grab that router and make some sawdust.
Build Smarter – For FREE!
Join the Tekton Crew and grab 3 FREE Workbench Build Plans with 3D models—plus exclusive DIY tips, tool reviews, and more!
How to Use a Router FAQs
What is a router used for in woodworking?
A router is used to shape edges, cut grooves, create joints, and hollow out areas in wood. It’s great for decorative work, flush trimming, dadoes, and joinery.
Is a router easy to use for beginners?
Yes, with the right setup and safety precautions, a router is beginner-friendly. Start with shallow passes, secure your workpiece, and practice on scrap wood first.
What is the difference between a plunge router and a fixed-base router?
A fixed-base router holds the bit at a set depth—ideal for edge work. A plunge router allows the bit to lower into the material mid-cut, which is useful for inlays, mortises, and interior cuts.
Which direction should I feed the router?
You should feed the router against the rotation of the bit. For outside edges, move left to right (clockwise); for inside cuts or openings, go counterclockwise.
How deep should you cut with a router?
Limit each pass to 1/8″–1/4″ depending on the bit and material. Shallow, multiple passes produce smoother results and reduce the risk of burning or tear-out.
Can you use a router on plywood or MDF?
Yes, routers work on plywood and MDF, but they can burn or chip if you go too deep or use a dull bit. Use sharp bits and keep your passes light.
What is the most useful router bit for beginners?
A round-over bit is one of the most versatile for beginners—it softens edges and adds a professional look. Flush-trim and straight bits are also essential for basic projects.
Do I need a router table to use a router?
No, routers can be used freehand, but a router table offers better control for small pieces and repeatable cuts. It’s a good upgrade once you’re comfortable with the basics.
Can a router replace a table saw?
No, routers are for shaping and cutting grooves or edges—not for long straight rips or crosscuts. Use both tools together for different tasks.
How do I know if my router bit is dull?
If you see burn marks, hear a whining motor, or notice rough edges, your bit is likely dull. Replace or sharpen it for cleaner, safer cuts.


